The following prorgram shows how to feed data into FFMPEG and get data from FFMPEG and display it. The program is based on Windows Python. Here are the features:
|
import numpy as np import cv2 import subprocess as sp import threading import sys import re import time class VidDecCtx(): FFMPEG_CMD = [ \ 'c:\\Program Files (x86)\\WinFF\\ffmpeg.exe', '-i', 'pipe:', \ '-f', 'rawvideo', '-pix_fmt', 'bgr24', '-an', '-sn', 'pipe:' \ ] DEFAULT_STOP_CNT = 100 READ_BUF_SIZE = 1024 READ_DECODE_BUF_SIZE = 100*1024 def __init__(self): self.process = None self.pthread = None self.buf = bytearray() self.fp = None self.toStopRunCnt = 0 self.isRunning = False def openVidFile(self, vFile): try: self.fp = open(vFile, 'rb') except Exception as e: self.fp = None return False return True def writer(self, toBuffer): while self.isRunning: if not toBuffer and len(self.buf)>0: time.sleep(0) byte_s = self.buf[0:VidDecCtx.READ_BUF_SIZE] self.buf = self.buf[VidDecCtx.READ_BUF_SIZE:] else: byte_s = self.fp.read(VidDecCtx.READ_BUF_SIZE) if toBuffer: self.buf += bytearray(byte_s) if not byte_s: break self.process.stdin.write(byte_s) self.toStopRunCnt = (self.toStopRunCnt-1) if self.toStopRunCnt>0 else 0 if self.toStopRunCnt==1: break self.process.stdin.close() self.toStopRunCnt = 0 self.isRunning = False def prepareGetDim(self): self.process = sp.Popen(VidDecCtx.FFMPEG_CMD, stdin=sp.PIPE, stderr=sp.STDOUT, \ stdout=sp.PIPE, bufsize=VidDecCtx.READ_DECODE_BUF_SIZE) self.isRunning = True self.pthread = threading.Thread(target=self.writer, args=[True]) self.pthread.start() def prepareDecode(self): self.process = sp.Popen(VidDecCtx.FFMPEG_CMD, stdin=sp.PIPE, stderr=sp.DEVNULL, \ stdout=sp.PIPE, bufsize=VidDecCtx.READ_BUF_SIZE) self.isRunning = True self.pthread = threading.Thread(target=self.writer, args=[False]) self.pthread.start() def stopThread(self): # need to continue to feed some data so that can quit gracefully self.toStopRunCnt = VidDecCtx.DEFAULT_STOP_CNT def cleanupThread(self): if self.pthread is not None: self.pthread.join() self.pthread=None if self.process is not None: try: self.process.wait(0.1) except (sp.TimeoutExpired): self.process.kill() self.process = None def finish(self): if self.fp is not None: self.fp.close() self.fp = None class LineBuffer(): def __init__(self): self.strBuf = bytearray() self.prevStrBufSearchIdx = 0 def feedBytes(self, byte_s): # Extract printable characters, and process line bye line tmp = filter(lambda x: x==0xa or x==0xd or (x>=0x20 and x<=0x7f), byte_s) self.strBuf += bytearray(tmp) def getLine(self): tmp=self.strBuf.find(0xa, self.prevStrBufSearchIdx) if tmp==-1: self.prevStrBufSearchIdx = len(self.strBuf) return None else: # do something to self.strBuf[:tmp] tmpStr=self.strBuf[:tmp].decode() self.strBuf = self.strBuf[tmp+1:] self.prevStrBufSearchIdx=0 return tmpStr if __name__ == "__main__": if len(sys.argv)!=2: print("Usage: c:\Python\python37\python %s vFile"%sys.argv[0], file=sys.stderr) sys.exit() vDCtx = VidDecCtx() lineBuf = LineBuffer() if not vDCtx.openVidFile(sys.argv[1]): print("Failed to open %s"%sys.argv[1], file=sys.stderr) sys.exit() width = None height = None bufSize = 1024 dimRegEx = re.compile(' *?Stream #.*?Video:.*?, *(\d+)x(\d+),') ######################################### # get dimension vDCtx.prepareGetDim() while vDCtx.isRunning: in_bytes = vDCtx.process.stdout.read(bufSize) if not in_bytes: break; if width is None: lineBuf.feedBytes(in_bytes) while True: tmpStr=lineBuf.getLine() if tmpStr is None: break tmpMatch=dimRegEx.match(tmpStr) if tmpMatch is not None: width=int(tmpMatch.group(1)) height=int(tmpMatch.group(2)) vDCtx.stopThread() break vDCtx.cleanupThread() if width is None: print("Failed to get the dimension of video", file=sys.stderr) sys.exit() print("Video dimension: (%d,%d)"%(width, height), file=sys.stderr) print("Buffered video data: %d"%(len(vDCtx.buf)), file=sys.stderr) ######################################### # decoding bufSize=width*height*3 vDCtx.prepareDecode() while vDCtx.isRunning: in_bytes = vDCtx.process.stdout.read(bufSize) if not in_bytes: break; # Transform the byte read into a NumPy array in_frame = (np.frombuffer(in_bytes, np.uint8).reshape([height, width, 3])) # Display the frame (for testing) cv2.imshow('in_frame', in_frame) if cv2.waitKey(1) & 0xFF == ord('q'): vDCtx.stopThread() vDCtx.cleanupThread() vDCtx.finish() |
2020年8月23日 星期日
How to use ffmpeg to convert and display video in Python (Windows)?

2018年12月28日 星期五
How to run a standalone GUI program without any desktop in Raspberry Pi (Raspbian Lite)?
How to run a standalone GUI program without any desktop in Raspberry Pi (Raspbian
Lite)?
[1]: http://xpt.sourceforge.net/techdocs/nix/x/general/xwin03-WinManagerdesktopsChoosing/ar01s04.html
- Install Raspbian Lite into Raspberry Pi
- Upgrade the Raspbian Lite:
sudo apt-get install update - Install lightdm and xinit
sudo apt-get install lightdm xinit - Depends on whether you need user to login or not, set it in:
sudo raspi-config > Boot Options > Desktop / CLI
- Now when you reboot, you will see the desktop with Xterm launched.
- According to [1], this is why the xterm is launched:
- /etc/X11/xinitrc
- which runs . /etc/X11/Xsessions
- which runs all scripts in /etc/X11/Xsession.d
- which runs /etc/X11/Xsession.d/99x11-common_start
- which runs $STARTUP
- if ~/.xsession is defined, then $STARTUP is ~/.xsession
- To launch other program, create ~/.xsession, added content like:
chromium-browser --start-fullscreen - In 201x, Google introduces the No Tofu font. To install it: sudo apt-get install fonts-noto
[1]: http://xpt.sourceforge.net/techdocs/nix/x/general/xwin03-WinManagerdesktopsChoosing/ar01s04.html
2018年4月30日 星期一
如何從荃灣步行到青衣
如何從荃灣西站步行到青衣地鐵站
- 第一站海濱花園。在荃灣西站D出口出,靠海濱行。

目的地是青衣地鐵站。

- 第二站青荃橋的荃灣邊入口。
- 先上停車場頂層。


- 看到青荃橋,向荃灣入口那邊進發。

- 途中要上落多個停車場,不詳述。


- 到「海葵閣」的「平台E停車場」(紅色箭嘴示)。


- 「海葵閣」的「平台E停車場」附近有一樓梯往青荃橋荃灣入口。(紅色箭嘴示)
不知道什麼原因,這入口異常的隱蔽,沒有任何指示。
估計是地鐵不想太多人懂得這條路,從而不坐地鐵東涌線。另一個可能性,是怕人跳橋。

- 先上停車場頂層。
- 第三站青荃橋左側入口。
-
進入入口後,轉右可沿青荃橋的"右"邊(面向青衣方向)前往青衣。
問題是,這是前往青衣的安定村,不能到青衣站。

- 要前往青衣地鐵站,必須在進入入口後轉左,落樓梯,穿過橋底去橋的左側。


(當日去是清明後的數星期,還有孝子賢孫去荃灣華人永遠墳場拜祭)

-
進入入口後,轉右可沿青荃橋的"右"邊(面向青衣方向)前往青衣。
- 第四站青荃橋
- 青荃橋的左邊。

- 從青荃橋中間拍攝的破破爛爛舊船澳(只是亂估以前是船澳,沒有調查過)。
- 前面的橋應該是青衣北橋(行車橋)

- 第五站青衣城。全程不用30分鐘。


2016年1月5日 星期二
Cross compile subversion server (svnserve) from scratch for openwrt:
Unfortunately svnserve is not likely to be availabe in the chaos calmer (15.05) version of of openwrt.
This article describes how to cross compile svnserve (with very basic funtionality) from scratch with the toolchain.
It assumed the "mvebu" toolchain for the router Linksys WRT1200AC / WRT1900AC, but the procedures are similar for other routers.
(Reference: https://forum.openwrt.org/viewtopic.php?id=11693)
mkdir /tmp/svn_repos
svnadmin create --fs-type fsfs /tmp/svn_repos
Added 3 lines to setup svn password:
In /tmp/svn_repos/conf/svnserve.conf, uncomment the folowing 3 lines
anon-access = read
auth-access = write
password-db = passwd
Add in /tmp/svn_repos/conf/passwd, password for "yylam"
To restart svn server is in /etc/rc.local
/usr/bin/svnserve -d -r /tmp/svn_repos
From OpenWrt forum: Looks like the same SVN package from the OpenWRT old_packages git repository. To reactivate the old_packages, add the following line to your feeds.conf file.
This article describes how to cross compile svnserve (with very basic funtionality) from scratch with the toolchain.
It assumed the "mvebu" toolchain for the router Linksys WRT1200AC / WRT1900AC, but the procedures are similar for other routers.
- Download the toolchain for WRT1200AC OpenWrt-Toolchain-mvebu_gcc-5.2.0_musl-1.1.11_eabi.Linux-x86_64.tar.bz2
- Download subversion-1.6.23.tar.gz.
- Download apr-1.2.12.tar.bz2
- Download apr-util-1.2.12.tar.bz2
- Download sqlite-amalgamation-3.6.13.tar.gz
- Download zlib-1.2.8.tar.gz
- Assume working directory is: /home/dev/svn_wrt1200ac.
Put all source files above in /home/dev/svn_wrt1200ac/archive.
cd /home/dev/svn_wrt1200ac - Add cross compiler in PATH.
tar xjvf archive/OpenWrt-Toolchain-mvebu_gcc-5.2.0_musl-1.1.11_eabi.Linux-x86_64.tar.bz2
export PATH=$PATH:/home/dev/svn_wrt1200ac/OpenWrt-Toolchain-mvebu_gcc-5.2.0_musl-1.1.11_eabi.Linux-x86_64/toolchain-arm_cortex-a9+vfpv3_gcc-5.2.0_musl-1.1.11_eabi/bin/
Run arm-openwrt-linux-gcc to see if you can run the executable
- Decompress the sources files in the right positions:
tar xzvf archive/subversion-1.6.23.tar.gz
tar xjvf archive/apr-1.2.12.tar.bz2
tar xjvf archive/apr-util-1.2.12.tar.bz2
tar xzvf archive/zlib-1.2.8.tar.gz
tar xzvf archive/sqlite-amalgamation-3.6.13.tar.gz
cd subversion-1.6.23
ln -s ../sqlite-3.6.13/ sqlite-amalgamation
- Compile zlib first
cd ../zlib-1.2.8
CC=arm-openwrt-linux-gcc ./configure --prefix=/home/dev/svn_wrt1200ac/finalBins/usr
make install
- Compile apr
cd ../apr-1.2.12/
./configure --host=arm-openwrt-linux \
ac_cv_file__dev_zero="yes" \
ac_cv_func_setpgrp_void="yes" \
apr_cv_process_shared_works="yes" \
apr_cv_mutex_robust_shared="no" \
apr_cv_tcp_nodelay_with_cork="no" \
ac_cv_sizeof_struct_iovec="8" \
apr_cv_mutex_recursive="yes" \
--prefix=/home/dev/svn_wrt1200ac/finalBins/usr
patch -p 0 include/apr.h
Copy and paste the following, and then press Ctrl+D
@@ -355,10 +355,10 @@
* to find the logic for this definition search for "ssize_t_fmt" in
* configure.in.
*/
-#error Can not determine the proper size for ssize_t
+#define APR_SSIZE_T_FMT "d"
/* And APR_SIZE_T_FMT */
-#error Can not determine the proper size for size_t
+#define APR_SIZE_T_FMT "d"
/* And APR_OFF_T_FMT */
#define APR_OFF_T_FMT APR_INT64_T_FMT
Start compile.
make install
-
Compile apr-util
cd ../apr-util-1.2.12/
cd xml/expat
./configure --host=arm-openwrt-linux --prefix=/home/dev/svn_wrt1200ac/finalBins/usr
make install
cd ../../
./configure --host=arm-openwrt-linux --with-apr=/home/dev/svn_wrt1200ac/finalBins/usr \
--with-expat=/home/dev/svn_wrt1200ac/finalBins/usr \
--prefix=/home/dev/svn_wrt1200ac/finalBins/usr
make install
- Compile subversion
cd ../subversion-1.6.23
./configure --host=arm-openwrt-linux \
--with-zlib=/home/dev/svn_wrt1200ac/finalBins/usr \
--with-apr=/home/dev/svn_wrt1200ac/finalBins/usr \
--with-apr-util=/home/dev/svn_wrt1200ac/finalBins/usr \
--prefix=/home/dev/svn_wrt1200ac/finalBins/usr \
--without-berkeley-db
make install
- Making tarball and transfer to router.
cd ../finalBins
tar -czvf svn1.6.23_wrt1200ac_finalBins.tar.gz usr/lib/lib*so* usr/bin
Transfer the svn1.6.23_wrt1200ac_finalBins.tar.gz to router. Assume /tmp/svn_wrt1200ac_finalBins.tar.gz. e.g.:
scp svn1.6.23_wrt1200ac_finalBins.tar.gz root@192.168.1.1:/tmp/
In router, decompress:
cd /
tar -xzvf /tmp/svn1.6.23_wrt1200ac_finalBins.tar.gz
(Reference: https://forum.openwrt.org/viewtopic.php?id=11693)
mkdir /tmp/svn_repos
svnadmin create --fs-type fsfs /tmp/svn_repos
Added 3 lines to setup svn password:
In /tmp/svn_repos/conf/svnserve.conf, uncomment the folowing 3 lines
anon-access = read
auth-access = write
password-db = passwd
Add in /tmp/svn_repos/conf/passwd, password for "yylam"
To restart svn server is in /etc/rc.local
/usr/bin/svnserve -d -r /tmp/svn_repos
From OpenWrt forum: Looks like the same SVN package from the OpenWRT old_packages git repository. To reactivate the old_packages, add the following line to your feeds.conf file.
src-git old_packages git://git.openwrt.org/packages.githen, once you run scripts/feeds update old_packages; scripts/feeds install -a -p old_packages to update your OpenWRT, execute make menuconfig and enable the subversion package under Network --> Version Control Systems and then recompile your OpenWRT. If you don't like to add the old_packages, then either port the subversion package from the old_repository to OpenWRT GitHUB or wait for someone else to do this for you.
2015年1月18日 星期日
How to install cygwin ssh server and ensure auto login (using RSA public key)
How to install cygwin ssh server and ensure auto login (using RSA public key)
(based on http://techtorials.me/cygwin/sshd-configuration/)- In case you want to uninstall a previously installed CYGWIN ssh server:
(based on http://superuser.com/questions/110726/how-to-uninstall-reinstall-cygwin-to-use-the-sshd)
In a Cygwin terminal, type the following:# Remove sshd service
cygrunsrv --stop sshd
cygrunsrv --remove sshd
# Delete any sshd or related users (such as cyg_server) from /etc/passwd
# (use your favorite editor)
# Delete any sshd or relaged users (such as cyg_server) from the system
net user sshd /delete
net user cyg_server /delete - Make sure your windows has a administrator login. Example used is "ylam".
- Install CYGWIN or reinstall CYGWIN to have openssh and rsync.
- Run Cygwin Terminal
- Change the account settings of "ylam" for CYGWIN:
chmod +r /etc/passwd
chmod u+w /etc/passwd
chmod +r /etc/group
chmod u+w /etc/group
chmod 755 /var
touch /var/log/sshd.log
chmod 664 /var/log/sshd.log
editrights -l -u ylam
editrights -a SeAssignPrimaryTokenPrivilege -u ylam
editrights -a SeCreateTokenPrivilege -u ylam
editrights -a SeTcbPrivilege -u ylam
editrights -a SeServiceLogonRight -u ylam
editrights -l -u ylam - Run ssh-host-config. Type the parts in red below.
$ ssh-host-config
*** Info: Generating missing SSH host keys
*** Info: Creating default /etc/ssh_config file
*** Info: Creating default /etc/sshd_config file
*** Info: StrictModes is set to 'yes' by default.
*** Info: This is the recommended setting, but it requires that the POSIX
*** Info: permissions of the user's home directory, the user's .ssh
*** Info: directory, and the user's ssh key files are tight so that
*** Info: only the user has write permissions.
*** Info: On the other hand, StrictModes don't work well with default
*** Info: Windows permissions of a home directory mounted with the
*** Info: 'noacl' option, and they don't work at all if the home
*** Info: directory is on a FAT or FAT32 partition.
*** Query: Should StrictModes be used? (yes/no) yes
*** Info: Privilege separation is set to 'sandbox' by default since
*** Info: OpenSSH 6.1. This is unsupported by Cygwin and has to be set
*** Info: to 'yes' or 'no'.
*** Info: However, using privilege separation requires a non-privileged account
*** Info: called 'sshd'.
*** Info: For more info on privilege separation read /usr/share/doc/openssh/READ
ME.privsep.
*** Query: Should privilege separation be used? (yes/no) yes
*** Info: Updating /etc/sshd_config file
*** Query: Do you want to install sshd as a service?
*** Query: (Say "no" if it is already installed as a service) (yes/no) yes
*** Query: Enter the value of CYGWIN for the daemon: [] (Press Enter)
*** Info: On Windows Server 2003, Windows Vista, and above, the
*** Info: SYSTEM account cannot setuid to other users -- a capability
*** Info: sshd requires. You need to have or to create a privileged
*** Info: account. This script will help you do so.
*** Info: It's not possible to use the LocalSystem account for services
*** Info: that can change the user id without an explicit password
*** Info: (such as passwordless logins [e.g. public key authentication]
*** Info: via sshd) when having to create the user token from scratch.
*** Info: For more information on this requirement, see
*** Info: https://cygwin.com/cygwin-ug-net/ntsec.html#ntsec-nopasswd1
*** Info: If you want to enable that functionality, it's required to create
*** Info: a new account with special privileges (unless such an account
*** Info: already exists). This account is then used to run these special
*** Info: servers.
*** Info: Note that creating a new user requires that the current account
*** Info: have Administrator privileges itself.
*** Info: No privileged account could be found.
*** Info: This script plans to use 'cyg_server'.
*** Info: 'cyg_server' will only be used by registered services.
*** Query: Do you want to use a different name? (yes/no) yes
*** Query: Enter the new user name: ylam
*** Query: Reenter: ylam
*** Query: Please enter the password for user 'ylam': ylam's Window's password
*** Query: Reenter: renter
*** Info: The sshd service has been installed under the 'sshd'
*** Info: account. To start the service now, call `net start sshd' or
*** Info: `cygrunsrv -S sshd'. Otherwise, it will start automatically
*** Info: after the next reboot.
*** Info: Host configuration finished. Have fun! - Start the ssh server by:
net start sshd
- Modify Windows firewall to allow port 22 traffic.
(http://diddy.boot-land.net/ssh/files/firewall.htm)
Control Panel -> Windows Firewall -> Advanced settings -> Inbound Rules (right click) -> New rule
... Select TCP and enter 22 ....
- Test the connection:
ssh -v ylam@localhost
(Note: "ylam" should be replaced with your login. And a password is prompted)
- For login without password, at the remote site (For testing, use local site should also be fine), type:
a) ssh-keygen -t rsa (press enter for everything)
b) ssh-copy-id -i ~/.ssh/id_rsa.pub abc@localhost
c) try login again: ssh abc@localhost. You will not need any password.
2014年12月26日 星期五
How to fix the color problem in the idx / sub file?
How to fix the color problem in the idx / sub file?
Sometimes, even the trick of changing the palette:palette: 000000, 000000, 000000, ffffff, ffffff, ffffff, ffffff, ffffff, ffffff, ffffff, ffffff, ffffff, ffffff, ffffff, ffffff, 000000
in idx file, there are still problem in the subtitle. Using SubResync in VobSub, some of the subtitle, some of subtitle look ugly:
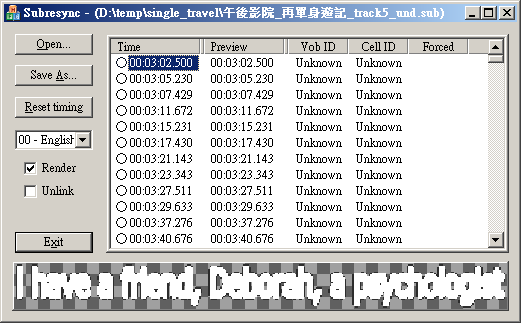
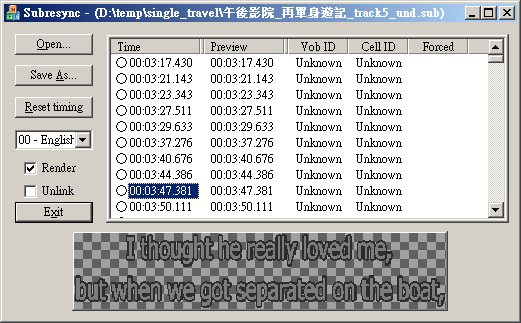
To fix this:
- With subresync, save the final.idx / final.sub as DVDMaestro format.

- You will see final.son, final.spf (palette) and some bitmaps.

- Open the bitmap file, you will see something like this:

Open it with image editor (e.g. GIMP) it is noted it is a bitmap with 16 color palette.
But only 4 of color palette entries are used.

The 4 colors are: 0x0000ff00 (blue), 0xff000000 (red), 0x00000000 (black) and 0xffffff00 (white)
We are using this color palette for the subtitle. This color palette must be saved in final.spf.
With notepad, save the following to a text file final.spf.xxd:
0000000: 0000 ff00 ff00 0000 0000 0000 ffff ff00 ................
0000010: ffff ff00 ffff ff00 ffff ff00 ffff ff00 ................
0000020: ffff ff00 ffff ff00 ffff ff00 ffff ff00 ................
0000030: ffff ff00 ffff ff00 ffff ff00 ffff ff00 ................
Using xxd (link) to convert it to final.spf.
xxd -r < final.spf.xxd > final.spf
- Fix the final.son so that the color palette is fixed.
st_format 2
Display_Start non_forced
TV_Type PAL
Tape_Type NON_DROP
Pixel_Area (0 573)
Directory .
Subtitle final
Display_Area (0 2 719 575)
Contrast (15 15 15 0)
SP_NUMBER START END FILE_NAME
Color (1 3 0 9)
Contrast (4 15 0 15)
0001 00:03:02:12 00:03:05:02 final_0001.bmp
Color (12 15 0 9)
Contrast (15 15 0 15)
0002 00:03:05:05 00:03:07:08 final_0002.bmp
Color (12 2 0 14)
0003 00:03:07:10 00:03:11:08 final_0003.bmp
Color (1 3 0 9)
Contrast (4 15 0 15)
0004 00:03:11:16 00:03:14:11 final_0004.bmp
Color (3 2 0 3)
Contrast (15 15 0 15)
0005 00:03:15:05 00:03:17:07 final_0005.bmp
Color (9 2 0 15)
0006 00:03:17:10 00:03:21:01 final_0006.bmp
Color (1 3 0 9)
Contrast (4 15 0 15)
0007 00:03:21:03 00:03:23:03 final_0007.bmp
The lines in red above caused the wrong subtitle used. So modify it to something like:
st_format 2
Display_Start non_forced
TV_Type PAL
Tape_Type NON_DROP
Pixel_Area (0 573)
Directory .
Subtitle final-2
Display_Area (0 2 719 575)
Contrast (15 15 0 15)
Color (1 2 0 3)
SP_NUMBER START END FILE_NAME
0001 00:03:02:12 00:03:05:02 final-2_0001.bmp
0002 00:03:05:05 00:03:07:08 final-2_0002.bmp
0003 00:03:07:10 00:03:11:08 final-2_0003.bmp
0004 00:03:11:16 00:03:14:11 final-2_0004.bmp
0005 00:03:15:05 00:03:17:07 final-2_0005.bmp
0006 00:03:17:10 00:03:21:01 final-2_0006.bmp
0007 00:03:21:03 00:03:23:03 final-2_0007.bmp
0008 00:03:23:08 00:03:27:00 final-2_0008.bmp
0009 00:03:27:12 00:03:29:13 final-2_0009.bmp
0010 00:03:29:15 00:03:30:23 final-2_0010.bmp
0011 00:03:37:06 00:03:40:14 final-2_0011.bmp
0012 00:03:40:16 00:03:41:21 final-2_0012.bmp
0013 00:03:44:09 00:03:47:06 final-2_0013.bmp
0014 00:03:47:09 00:03:50:01 final-2_0014.bmp
0015 00:03:50:02 00:03:51:02 final-2_0015.bmp
0016 00:03:51:04 00:03:53:08 final-2_0016.bmp
...Note: index 0 is the transparent color.
- Download SON2VOBSUB. Open the final.son. Change the height to 576.

Click Convert.
- Reopen final.idx with subresync. The subtitle is fixed.


2014年12月20日 星期六
How to convert TV program to mkv file with subtitle and everything?
This is an example recorded with Magic TV recorder. The movie recorded is "Life of Pi".
- Save the recorded program in a USB stick. Copy the *.ts file to d:\temp
and rename it to Pi.ts
- Use Handbrake to convert it to a
MKV file.
- De-interlace

- Add all the audio's

- Destination set to "d:\temp\Pi.mkv"
- Start convert.
- De-interlace
- Subtitle handling. Download
Project X - DVB demux Tool
- Drag d:\temp\Pi.ts to it.

- Goto PreSettings menu. Choose only to output subtitle:

- Subtitle settings:

- Start convert by clicking "Quick start" and you should get the
following files:
Pi.sup.idx, Pi.sup.sub, Pi-02.sup.idx, Pi-02-sup.sub
- Drag d:\temp\Pi.ts to it.
- Fix the problem (color and time) of the subtitles. Download
VobSub.
- Open SubResync under VobSub. Drag
Pi.sup.idx to it. The subtitle color is not correct and the subtitle is not
clear.

- Open P1.sup.idx with Notepad. The color index is:
...
time offset: 0
forced subs: OFF
palette: 000060, 2b2b2b, 2c2c2c, 535353, 353535, 414141, 636363, 7d7d7d, c9c9c9, 8f8f8f, dbdbdb, a9a9a9, ebebeb, 9c9c9c, b8b8b8, 2b2b2b
custom colors: OFF, tridx: 1000, colors: 600000, 101010, ffffff, a9a9a9
langidx: 0
id: --, index: 0
....By experiment, it is noted that the color marked in red above are the outline of the characters. Suggest to change it to pure black 000000.
Change the rest to white (ffffffff), i.e.
palette: 000000, 000000, 000000, ffffff, ffffff, ffffff, ffffff, ffffff, ffffff, ffffff, ffffff, ffffff, ffffff, ffffff, ffffff, 000000

- It is also noted that the timestamp of the subtitle is incorrect.
Example the first valid subtitle extracted is at 00:09:57.807

But it actually happens at 00:05:52.500 in the movie (by manually playing the P1.mkv file generated)
To fix it, double right click the circle of the subtitle item until it becomes a download triangle.
And type in the correct time.

Save the subtitle as Pi-1-final.idx / sub.
- Do the same to other subtitle Pi-02.sup.idx/sub. Save as
Pi-2-final.idx/sub
- Open SubResync under VobSub. Drag
Pi.sup.idx to it. The subtitle color is not correct and the subtitle is not
clear.
- Put the subtitle in the P1mkv file. Download
mkvmerge
- Open it. Add Pi-1-final.idx/sub Pi-2-final.idx/sub

- Start muxing as P1-subtitled.mkv
- The final movie has everything:

- Open it. Add Pi-1-final.idx/sub Pi-2-final.idx/sub
2014年9月21日 星期日

2014年9月20日 星期六


2014年9月14日 星期日
GIMP reverse curve-bend
This example shows how to curve-bend an label stuck on a cylindrical surface to rectangular area.
- Save the following Python-fu script to C:\Program Files\GIMP
2\lib\gimp\2.0\plug-ins\my_curve_bend.py
(Assume GIMP is installed in C:\Program Files\GIMP 2)
Note that the pdb.plug_in_curve_bend() is used.
- Open the sample label in GIMP.

- Goto Menu Windows -> New Toolbar. Double click the "Path" toolbar

- Draw a upper path along the curved surface. Please use maximum 16 segments.
(Note you can use Ctrl + Mouse scroll to zoom-in)

- Press the Shift key to start a new path segment.
Draw a lower path along the curved surface. Please use maximum 16 segments.

- Start the bending by go to Menu Python-fu -> My curve bend.
Here is the result:

- You can hide away / delete other layers by: Menu Windows -> Dockable Dialogue -> Layers
And delete the layers

- The original image layer was removed. Note the red line showing the original
image was bent according to mirror of the upper and lower path.

- The image was cropped and the result image:
->

| #!/usr/bin/env python from gimpfu import * from array import array def my_curve_bend(image, drawable) : pdb.gimp_message('my_curve_bend') # Please plot the upper path from left to right. # then press shift # then plot the lower path from left to right. cur_image = gimp.image_list()[0]; cur_layer = cur_image.layers[0]; # get the points of upper path and lower paths. # Note that: with gimp_vectors_stroke_get_points, the vectors has control points, center and control points. # some code is added to extract only the center points. active_vectors = pdb.gimp_image_get_active_vectors(cur_image) nstrokes, strokes = pdb.gimp_vectors_get_strokes(active_vectors) upper_type, upper_num_points, upper_controlpoints, upper_closed = pdb.gimp_vectors_stroke_get_points(active_vectors, strokes[0]) lower_type, lower_num_points, lower_controlpoints, lower_closed = pdb.gimp_vectors_stroke_get_points(active_vectors, strokes[1]) upper_point_x_s = array('d', []) for i in xrange(2,len(upper_controlpoints),6): upper_point_x_s.append(upper_controlpoints[i]) upper_point_y_s = array('d', []) for i in xrange(3,len(upper_controlpoints),6): upper_point_y_s.append(upper_controlpoints[i]) lower_point_x_s = array('d', []) for i in xrange(2,len(lower_controlpoints),6): lower_point_x_s.append(lower_controlpoints[i]) lower_point_y_s = array('d', []) for i in xrange(3,len(lower_controlpoints),6): lower_point_y_s.append(lower_controlpoints[i]) # calculate the bounding rectangle and make selection top_l_x = upper_point_x_s[0]; top_l_y = upper_point_y_s[0]; top_r_x = upper_point_x_s[len(upper_point_x_s)-1]; top_r_y = upper_point_y_s[len(upper_point_y_s)-1]; btm_l_x = lower_point_x_s[0]; btm_l_y = lower_point_y_s[0]; btm_r_x = lower_point_x_s[len(lower_point_x_s)-1]; btm_r_y = lower_point_y_s[len(lower_point_y_s)-1]; bb_x = min(upper_point_x_s + lower_point_x_s) bb_y = min(upper_point_y_s + lower_point_y_s) bb_w = max(upper_point_x_s + lower_point_x_s) - bb_x bb_h = max(upper_point_y_s + lower_point_y_s) - bb_y pdb.gimp_rect_select( cur_image, # image \ bb_x, # x \ bb_y, # y \ bb_w, # width \ bb_h, # height \ 0, # operation \ 0, # feather \ 0 # feather_radius \ ) # calculate the bending curve mirrored. top_avg_y = (top_l_y + top_r_y)/2.0 btm_avg_y = (btm_l_y + btm_r_y)/2.0 top_len = (top_r_x - top_l_x) btm_len = (btm_r_x - btm_l_x) upper_point_x_s_final = [ (x - top_l_x) / top_len for x in upper_point_x_s] upper_point_y_s_final = [ 0.5 + ((y-top_avg_y) / (1.0 * top_len)) for y in upper_point_y_s] lower_point_x_s_final = [ (x - btm_l_x) / btm_len for x in lower_point_x_s] lower_point_y_s_final = [ 0.5 + ((y-btm_avg_y) / (1.0 * btm_len)) for y in lower_point_y_s] upper_val_y_s = array('b', []) lower_val_y_s = array('b', []) bent_layer = pdb.plug_in_curve_bend(\ cur_image # image \ , cur_layer # drawable \ , 0.0 # rotation \ , TRUE # smoothing \ , TRUE # antialias \ , TRUE # work_on_copy \ , 0 # curve_type \ , len(upper_point_x_s_final) # argc_upper_point_x \ , upper_point_x_s_final # upper_point_x \ , len(upper_point_y_s_final) # argc_upper_point_y \ , upper_point_y_s_final # upper_point_y \ , len(lower_point_x_s_final) # argc_lower_point_x \ , lower_point_x_s_final # lower_point_x \ , len(lower_point_y_s_final) # argc_lower_point_y \ , lower_point_y_s_final # lower_point_y \ , len(upper_val_y_s) # argc_upper_val_y \ , upper_val_y_s # upper_val_y \ , len(lower_val_y_s) # argc_lower_val_y \ , lower_val_y_s # lower_val_y \ ); pdb.gimp_layer_set_visible(bent_layer, TRUE) return # This is the plugin registration function # I have written each of its parameters on a different line register( #Your plugin's main function name, as it will be found in Gimp's Procedure Browser. #This means that your plugin will be callable by other plugins, using this function #name (even by a script in a another language)! "my_curve_bend", #Your plugin's "documentation" name, as it will also appears in the Procedure Browser. #This name should describe your plugin briefly. "My Curve Bend Python-Fu", #Plugin's help. Here you should explain in a more detailed manner what kind of function #your plugin provides. "This script does the reverse of curve bending", #The name of the author of this plugin "Y Lam", #Any copyright information needed "Y Lam", #The date this version of the plugin was released "Sep 2014", #The path in the menu where your plugin should be found "<Image>/Python-Fu/My Curve Bend", #The image types supported by your plugin "*", #The list of the parameters needed by your plugin [], #The results sent back by your plugin [], #The name of the local function to run to actually start processing, which will be called with a set of parameters. my_curve_bend, ) main() |
訂閱:
文章 (Atom)